How to Fix a Broken iPhone Charger: A Comprehensive Guide
We’ve all been there – you’re in the middle of an important call, your battery is on the verge of dying, and suddenly your iPhone charger starts acting up. The frustration of dealing with a broken iPhone charger is something most iPhone users can relate to. While the first instinct may be to rush out and buy a new one, you can often save time and money by attempting to repair it yourself. In this comprehensive guide, we’ll walk you through How to Fix a Broken iPhone Charger and ensure that your beloved device stays charged and ready for action.
How to Fix a Broken iPhone Charger
Identify the Problem
Before attempting any fixes, it’s crucial to determine what exactly is wrong with your iPhone charger. Here are some common issues:
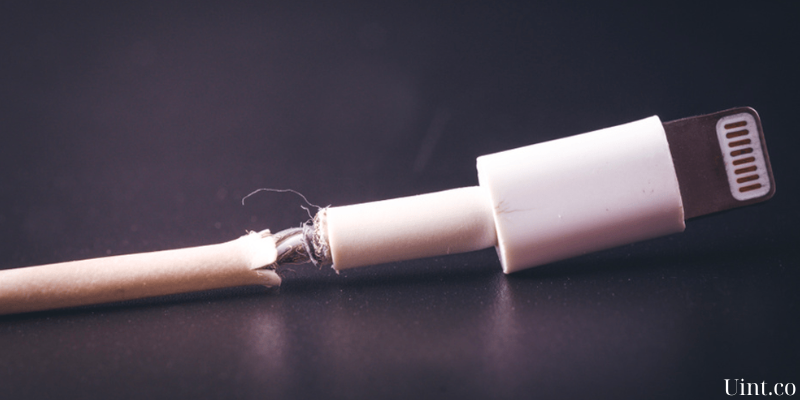
a. Frayed or Damaged Cable: Check the cable for any visible signs of damage. This includes fraying, exposed wires, or bent connectors. If you see any of these, the cable may need replacement.
b. Loose or Bent Connectors: Examine both the USB and Lightning connectors for any damage or looseness. Sometimes, bent pins can cause connectivity problems.
c. Non-functional Adapter: If your charger doesn’t work when plugged into the adapter, it could be a problem with the adapter itself.
d. Dirty or Clogged Connectors: Sometimes, dust, debris, or lint can accumulate in the connectors, causing charging issues.
Once you’ve pinpointed the problem, you can proceed with the appropriate fix.
Clean the Connectors
Before diving into more complicated repair methods, it’s worth checking if a simple cleaning might solve your charger problem. Dust, dirt, and lint can accumulate in the connectors over time, obstructing the connection. Here’s how to clean them:
a. Turn off your iPhone and unplug the charger.
b. Use a small, soft brush or a compressed air canister to gently remove any debris from the Lightning and USB connectors.
c. Reconnect your charger and try charging your iPhone.
This straightforward step can often resolve charging issues caused by dirty connectors.
Reinforce the Cable with Electrical Tape
If the issue is a frayed or damaged cable near the connectors, you can reinforce it with electrical tape to extend the cable’s life. Follow these steps:
a. Cut a small piece of electrical tape.
b. Carefully wrap the tape around the damaged area, ensuring it’s tightly secured.
c. Be sure not to obstruct the connectors in the process.
This method can help prolong the usability of your charger, but it may not be a permanent fix.
Heat-Shrink Tubing
For a more robust solution to fix a frayed or damaged cable, consider using heat-shrink tubing. This tubing, when heated, shrinks to create a protective layer around the cable. Here’s how to use it:
a. Cut a suitable length of heat-shrink tubing that can cover the damaged section of the cable.
b. Slide the tubing over the damaged area.
c. Use a heat gun or a hairdryer to evenly heat the tubing until it shrinks tightly around the cable.
This method can provide a more durable and aesthetically pleasing fix for damaged cables.
Use Sugru Moldable Glue
Sugru is a moldable glue that hardens into a durable, flexible silicone rubber. It’s an excellent choice for repairing frayed cables and reinforcing them. Here’s how to use Sugru:
a. Cut a small amount of Sugru and knead it to make it pliable.
b. Wrap the Sugru around the damaged cable, ensuring a tight seal.
c. Shape and smooth the Sugru as desired.
d. Allow it to dry for 24 hours.
Sugru not only reinforces the cable but also provides a more professional-looking repair.
DIY Replacement Cable
If your cable is too severely damaged to repair, you can attempt to create your own replacement cable. This is a more advanced DIY option, but it can save you money compared to buying a new charger. You will need a USB cable, a Lightning connector, and some soldering skills to proceed. Here’s a basic outline of the process:
a. Purchase a USB cable with a male USB-A connector on one end and cut off the other end.
b. Carefully strip the outer insulation of the cable to expose the wires inside.
c. Solder the exposed wires to a Lightning connector. Ensure you connect the correct wires to the corresponding pins on the Lightning connector (typically red for power, green and white for data, and black for ground).
d. Insulate the connections with heat-shrink tubing or electrical tape.
This method allows you to create a custom-length cable with a fresh connector, but it does require some technical know-how.
Inspect and Repair the Adapter
If your charger’s problem lies with the adapter, you can try to fix it as well. Here’s how:
a. Inspect the adapter for visible damage or loose connections.
b. If the problem is loose connectors, you can open the adapter (if possible) and re-solder the connections.
c. If the adapter is irreparably damaged, consider purchasing a replacement adapter, as tampering with electrical components can be hazardous.
Testing Your Repaired Charger
After completing the repairs, it’s essential to test your charger to ensure it’s working correctly. Plug it into a power source and your iPhone, and check if it charges without any issues. Make sure it’s secure and doesn’t overheat during the charging process.
Conclusion
Dealing with a broken Uint.co/the-most-cheapest-programs-to-fix-iphone/”>iPhone charger can be frustrating, but it doesn’t always mean you have to rush out and buy a new one. With the right tools and a bit of DIY spirit, you can often repair your charger and extend its lifespan. Whether it’s a simple cleaning, reinforcing the cable, or even crafting your own replacement cable, these methods can save you money and reduce electronic waste. However, it’s essential to prioritize safety, and if a repair seems beyond your skill level or the charger poses any electrical hazards, it’s best to seek professional assistance or invest in a new charger. By following the steps outlined in this comprehensive guide, you can keep your iPhone charged and ready for action while also being environmentally conscious.